Inhaltsverzeichnis
Subsonic Streaming Server unter Ubuntu
Installation
Benötigte Pakete
Zunächst muss das „Java Runtime Environment“ in Version 8 installiert werden. Ubuntu 18.04 liefert bereits OpenJDK-JRE 11 aus. Subsonic ist dazu jedoch nicht kompatibel.
# aptitude install openjdk-8-jre
Optionale Tools
Um Musikdateien direkt auf dem Server bearbeiten zu können, empfiehlt es sich, folgende Helferlein ebenfalls zu installieren:
# aptitude install id3 id3v2 eyed3
Nun kann das Installationspaket heruntergeladen werden, welches über die nachfolgende Webseite bezogen werden kann:
Auf der offiziellen Downloadseite wird immer die aktuellste Version verlinkt. Den Link kopiert man sich am besten und fügt diesen in der Shell in einen wget-Befehl ein.
# wget -c https://s3-eu-west-1.amazonaws.com/subsonic-public/download/subsonic-6.1.5.deb
Die eigentliche Installation erfolgt über die Paketverwaltung dpkg:
# dpkg -i subsonic-6.1.5.deb
Und schon läuft der Server:
# service subsonic status
● subsonic.service - LSB: Subsonic daemon
   Loaded: loaded (/etc/init.d/subsonic; generated)
   Active: active (running) since Mon 2019-03-11 20:47:38 CET; 7s ago
     Docs: man:systemd-sysv-generator(8)
    Tasks: 11 (limit: 2319)
   CGroup: /system.slice/subsonic.service
           └─8850 java -Xmx150m -Dsubsonic.home=/var/subsonic -Dsubsonic.host=0.0.0.0 -Dsubsonic.port=4040 -Dsubsonic.httpsPort=0 -Dsubsonic.contextPath=/ -Dsubsonic.db

Mär 11 20:47:37 xxx systemd[1]: Starting LSB: Subsonic daemon...
Mär 11 20:47:38 xxx subsonic[8812]: Started Subsonic [PID 8850, /var/subsonic/subsonic_sh.log]
Mär 11 20:47:38 xxx systemd[1]: Started LSB: Subsonic daemon.
Partition ändern
Als nächstes lege ich die Datenbank und Programmdateien von Subsonic auf eine andere Partition, da bei großen MP3-Sammlungen zum einen die Datenbank, aber insbesondere der Image-Cache sehr groß werden kann. Ich verschiebe das Subsonic-Verzeichnis auf die gewünschte Partition und setze im ursprüglichen Verzeichnis einen Softlink auf das Verzeichnis innerhalb der gewünschten Partition:
# service subsonic stop
# cd /var/subsonic
# mv subsonic/ /srv/
# ln -s /srv/subsonic/ subsonic
# ll
insgesamt 68
drwxr-xr-x 14 root root    4096 Mär 11 20:56 ./
drwxr-xr-x 23 root root    4096 Mär  6 12:39 ../
drwxr-xr-x  2 root root    4096 Mär 11 20:43 backups/
drwxr-xr-x 11 root root    4096 Mär 11 20:43 cache/
drwxrwxrwt  2 root root    4096 Mär 10 06:25 crash/
drwxr-xr-x 40 root root    4096 Jan 27 23:09 lib/
drwxrwsr-x  2 root staff   4096 Apr 24  2018 local/
lrwxrwxrwx  1 root root       9 Nov  3 12:32 lock -> /run/lock/
drwxrwxr-x 10 root syslog  4096 Mär 11 20:43 log/
drwx------  2 root root   16384 Nov  3 12:30 lost+found/
drwxrwsr-x  2 root mail    4096 Dez 30 18:36 mail/
drwxr-xr-x  2 root root    4096 Jul 25  2018 opt/
lrwxrwxrwx  1 root root       4 Nov  3 12:32 run -> /run/
drwxr-xr-x  2 root root    4096 Jul 19  2018 snap/
drwxr-xr-x  5 root root    4096 Dez 30 12:09 spool/
lrwxrwxrwx  1 root root      14 Mär 11 20:56 subsonic -> /srv/subsonic//
drwxrwxrwt  3 root root    4096 Mär 11 20:43 tmp/
Startparameter des Servers
Usage: subsonic.sh [options]
  --help               This small usage guide.
  --home=DIR           The directory where Subsonic will create files.
                       Make sure it is writable. Default: /var/subsonic
  --host=HOST          The host name or IP address on which to bind Subsonic.
                       Only relevant if you have multiple network interfaces and want
                       to make Subsonic available on only one of them. The default value
                       will bind Subsonic to all available network interfaces. Default: 0.0.0.0
  --port=PORT          The port on which Subsonic will listen for
                       incoming HTTP traffic. Default: 4040
  --https-port=PORT    The port on which Subsonic will listen for
                       incoming HTTPS traffic. Default: 0 (disabled)
  --context-path=PATH  The context path, i.e., the last part of the Subsonic
                       URL. Typically '/' or '/subsonic'. Default '/'
  --db=JDBC_URL        Use alternate database. MySQL, PostgreSQL and MariaDB are currently supported.
  --max-memory=MB      The memory limit (max Java heap size) in megabytes.
                       Default: 100
  --pidfile=PIDFILE    Write PID to this file. Default not created.
  --quiet              Don't print anything to standard out. Default false.
  --default-music-folder=DIR    Configure Subsonic to use this folder for music.  This option
                                only has effect the first time Subsonic is started. Default '/var/music'
  --default-podcast-folder=DIR  Configure Subsonic to use this folder for Podcasts.  This option
                                only has effect the first time Subsonic is started. Default '/var/music/Podcast'
  --default-playlist-folder=DIR Configure Subsonic to use this folder for playlist imports.  This option
                                only has effect the first time Subsonic is started. Default '/var/playlists'
Diese werden unter Ubuntu in der Datei /etc/default/subsonic geändert.
Hier möchten wir
- einen Dienstbenutzer für Subsonic hinterlegen
- den reservierten Arbeitsspeicher anpassen
- den Dienst auf die Loopback-Schnittstelle binden
Nun legen wir das Dienstkonto an:
# useradd -M -r -s /usr/sbin/false -d /var/subsonic subsonic
Da wir das Programmverzeichnis als Home für den User angegeben haben, müssen wir ihm auch die Eigentumsrechte darüber einräumen:
# cd /srv
# chown -R subsonic.root subsonic/
Jetzt können die Änderungen an der Startkonfiguration des Subsonic erfolgen.
[...]
#SUBSONIC_ARGS="--max-memory=150"
SUBSONIC_ARGS="--max-memory=256 --host=127.0.0.1 --port=4040"

# The user which should run the Subsonic process. Default "root".
# Note that non-root users are by default not allowed to use ports
# below 1024. Also make sure to grant the user write permissions in
# the music directories, otherwise changing album art and tags will fail.

#SUBSONIC_USER=root
SUBSONIC_USER=subsonic
Kontrolle:
# service subsonic start
# service subsonic status
● subsonic.service - LSB: Subsonic daemon
   Loaded: loaded (/etc/init.d/subsonic; generated)
   Active: active (running) since Mon 2019-03-11 21:18:06 CET; 24min ago
     Docs: man:systemd-sysv-generator(8)
  Process: 9119 ExecStop=/etc/init.d/subsonic stop (code=exited, status=0/SUCCESS)
  Process: 9219 ExecStart=/etc/init.d/subsonic start (code=exited, status=0/SUCCESS)
    Tasks: 32 (limit: 2319)
   CGroup: /system.slice/subsonic.service
           └─9239 java -Xmx256m -Dsubsonic.home=/var/subsonic -Dsubsonic.host=127.0.0.1 -Dsubsonic.port=4040 -Dsubsonic.httpsPort=0 -Dsubsonic.contextPath=/ -Dsubsonic.

Mär 11 21:18:06 xxx systemd[1]: Starting LSB: Subsonic daemon...
Mär 11 21:18:06 xxx subsonic[9219]: Started Subsonic [PID 9239, /var/subsonic/subsonic_sh.log]
Mär 11 21:18:06 xxx systemd[1]: Started LSB: Subsonic daemon.
Nginx Reverse Proxy
- /etc/nginx/sites-available/subsonic.meine-domain.de
server {
        server_name subsonic.meine-domain.de;
        location / {
                proxy_pass http://127.0.0.1:4040;
                proxy_set_header Host $http_host;
                proxy_set_header X-Real-IP $remote_addr;
                proxy_set_header X-Forwarded-For $proxy_add_x_forwarded_for;
                proxy_set_header X-Forwarded-Proto $scheme;
                proxy_redirect http:// https://;
        }


    listen 443 ssl; # managed by Certbot
    ssl_certificate /etc/letsencrypt/live/subsonic.meine-domain.de/fullchain.pem; # managed by Certbot
    ssl_certificate_key /etc/letsencrypt/live/subsonic.meine-domain.de/privkey.pem; # managed by Certbot
    include /etc/letsencrypt/options-ssl-nginx.conf; # managed by Certbot
    ssl_dhparam /etc/letsencrypt/ssl-dhparams.pem; # managed by Certbot


    add_header Strict-Transport-Security "max-age=31536000" always; # managed by Certbot


    ssl_trusted_certificate /etc/letsencrypt/live/subsonic.meine-domain.de/chain.pem; # managed by Certbot
    ssl_stapling on; # managed by Certbot
    ssl_stapling_verify on; # managed by Certbot

}
server {
    if ($host = subsonic.meine-domain.de) {
        return 301 https://$host$request_uri;
    } # managed by Certbot


        server_name subsonic.meine-domain.de;
        listen 80;


}
Apache Reverse Proxy
Pakete installieren:
# aptitude install apache2
# a2enmod proxy proxy_http headers
Virtual Host konfigurieren:
- /etc/apache2/sites-available/subsonic-proxy.conf
<VirtualHost *:80>
   ServerName subsonic.your-domain.de
   ErrorDocument 404 /404.html
   DocumentRoot /var/www/subsonic
   ProxyPass / http://localhost:4040/
   ProxyPassReverse / http://localhost:4040/
   Header always unset X-Frame-Options
</VirtualHost>
Virtual Host aktivieren:
# a2ensite subsonic-proxy
SSL mittels Certbot aktivieren. Die Installation von Certbot ist hier beschrieben.
# certbot --apache --agree-tos --redirect --hsts --staple-ocsp --must-staple --email your-email-address -d subsonic.your-domain.de
Update der Applikation
Der Entwickler von Subsonic stellt DEB-Files zur Verfügung. Die aktuellste Version kann hier bezogen werden:
Das Paket kann direkt mittels dpkg installiert werden. Dazu muss die Option i (install) übergeben werden. Das Paket erkennt zuvor installierte Instanzen und leitet ein Update ein:
# dpkg -i subsonic-6.1.5.deb
(Reading database ... 131187 files and directories currently installed.)
Preparing to unpack subsonic-6.1.5.deb ...
Unpacking subsonic (6.1.5) over (6.1.3) ...
Setting up subsonic (6.1.5) ...
Processing triggers for systemd (237-3ubuntu10.9) ...
Processing triggers for ureadahead (0.100.0-20) ...
Automatischer Export der Playlists
Subsonic speichert alle erstellten Playlists in seiner internen Datenbank. Es kann zwar jede Playlist als M3U-File über das Webinterface exportiert werden. Als Backupjob wäre dieses Vorgehen jedoch unbrauchbar. Es bleibt nur die Datenbank zu sichern (leider ist dieses Vorgehen nicht dokumentiert) oder die Playlists über die REST-API zu exportieren (diese ist sehr gut dokumentiert). Dies kann mit Hilfe des Python-Skripts SubsonicTools erledigt werden.
Eine kurze Anleitung ist hier zu finden:
Ist SubsonicTools auf dem System hinterlegt, kann es mittels Crontab täglich alle Playlists in einzelne M3U-Dateien exportieren.
Installation im Schnelldurchgang
1. Download des Skripts
# cd /opt
# git clone https://github.com/janjonas/SubsonicTools.git
2. Download des source codes der Python requests library
# cd /opt/
# git clone git://github.com/psf/requests.git
# cd requests/
3. Installation Python package index Vgl. https://wiki.ubuntuusers.de/pip/
# apt-get update
# aptitude search pip
# aptitude install python-pip
4. Installation der requests library
# pip install .
Korrekte Python Version einstellen
# update-alternatives --config python
There are 3 choices for the alternative python (providing /usr/bin/python).

  Selection    Path                Priority   Status
------------------------------------------------------------
  0            /usr/bin/python2.7   10        auto mode
  1            /usr/bin/python2     10        manual mode
* 2            /usr/bin/python2.7   10        manual mode
  3            /usr/bin/python3     10        manual mode

Press <enter> to keep the current choice[*], or type selection number: 0
Test:
# python --version
Python 2.7.15+
Verfügbare Python-Module auflisten
# python -c "help('modules')"
Automatischer Import der Playlists
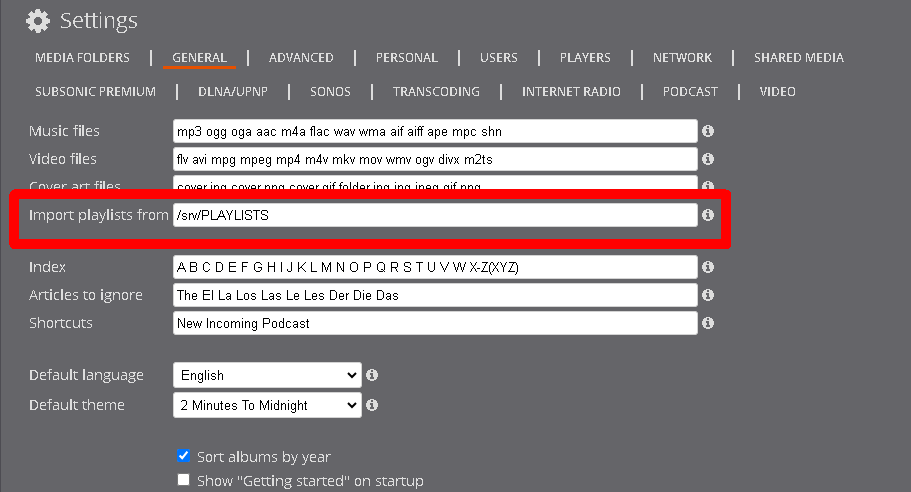
Dazu hat Subsonic einen eigenen Ordner auf dem Filesystem. Der Pfad ist in der Konfiguration hinterlegt:
Die M3U-Files müssen in diesem Ordner abgelegt werden. Dabei ist wichtig, dass die Pfade in den M3U-Dateien stimmen. Beim nächsten Folder-Scan wird auch der Playlist-Ordner berücksichtigt und die M3U-Dateien werden zu Playlists in Subsonic umgewandelt.
Arbeiten auf der Datenbank (Built-in HSQLDB)
Als Adminuser kann unter https://[subsonic-server.url]/db.view ein Webinterface aufgerufen werden, dass es ermöglicht, SQL-Statements ausführen zu lassen.
Subsonic arbeitet von Hause aus mit einer HSQLDB. Diese ist dokumentiert unter http://hsqldb.org/.
Alle Tabellen anzeigen lassen
SELECT * FROM INFORMATION_SCHEMA.SYSTEM_TABLES WHERE TABLE_TYPE='TABLE';
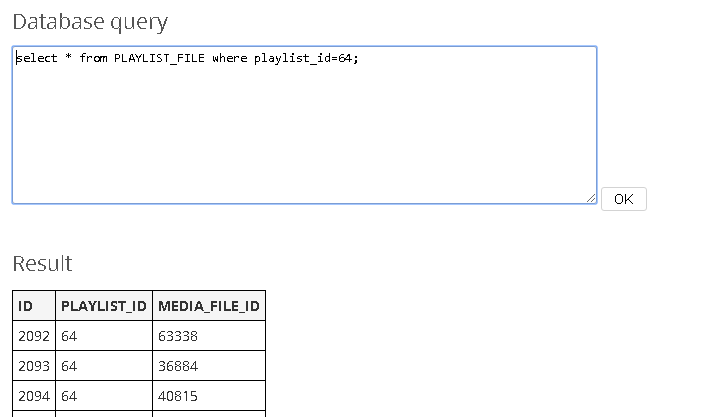
Alle Lieder einer Playlist anzeigen lassen
Die PLAYLIST_ID=64 muss entsprechend geändert werden.
SELECT PLAYLIST_FILE.ID, MEDIA_FILE.PATH, MEDIA_FILE.ARTIST,MEDIA_FILE.TITLE FROM MEDIA_FILE LEFT OUTER JOIN PLAYLIST_FILE ON PLAYLIST_FILE.MEDIA_FILE_ID = MEDIA_FILE.ID WHERE PLAYLIST_ID=64 ORDER BY ID DESC;
Anzahl Lieder inenrhalb einer Playlist ermitteln
SELECT COUNT(*) FROM PLAYLIST_FILE WHERE playlist_id=64;
Externe Datenbank nutzen
Es werden unterstützt
- MySQL / MariaDB
- PostgreSQL
Eine Installation in eine PostgreSQL habe ich nicht ausprobiert. Daher sind diese Notizen alle auf MariaDB / MySQL bezogen!
Einfach als Startparameter übergeben:
–db=<JDBC URL> unter SUBSONIC_ARGS in /etc/default/subsonic (Ubuntu/Debian):
SUBSONIC_ARGS="--max-memory=1500 --host=127.0.0.1 --port=4040 --db=jdbc:mysql://127.0.0.1:3306/subsonic?user=subsonic_user&password=xxx&characterEncoding=UTF-8&autoReconnect=true&useSSL=false&requireSSL=false"
Datenbank und User anlegen
CREATE DATABASE IF NOT EXISTS subsonic;
CREATE USER 'subsonic_server'@localhost IDENTIFIED BY 'xxx';
GRANT ALL PRIVILEGES ON 'subsonic'.* TO 'subsonic_server'@localhost;
FLUSH PRIVILEGES;
Probleme beim Scannen der Daten: Spaltengröße in DB anpassen
USE subsonic;
ALTER TABLE album  MODIFY genre VARCHAR(256) NULL DEFAULT NULL;
ALTER TABLE  media_file MODIFY genre VARCHAR(256) NULL DEFAULT NULL;
ALTER TABLE genre MODIFY name VARCHAR(256) NOT NULL DEFAULT '';
quit;
DB-Connection-Timeout erhöhen
- /etc/mysql/mariadb.conf.d/50-server.cnf
[...]
wait_timeout = 7776000
[...]


